


How to hack Windows XP Password without resetting old Password.
Wednesday, September 23, 2009
0
comments
Pls follow the steps given below:
- Download Kon-Boot ISO and burn to CD. Refer to this article if you don’t know how to burn ISO file to CD.http://www.piotrbania.com/
all/kon-boot/
- Insert the Kon-Boot CD that you just burned and boot the computer with the CD. You will need to configure the BIOS to start up the computer with CD.
- A kryptos login splash screen appears. You’ll need to hit enter to continue or else the screen will stay there.
- Kon-Boot will tell you that it is ready to hax0R in. It will check SMAP BIOS entries, detect dummy BIOS, and fix SMAP entries.
- Windows will now load as normal.
- When the Log On to Windows box appear, simply type anything in the password box and you’re in! You can even leave the password field blank.
Enjoy!!!

Based on Xubuntu 9.04 Jaunty Jackalope, Linux 2.6.28, XFCE 4.6 and Xorg 7.4, Linux Mint 7 "Gloria" XFCE CE features a lot of improvements and the latest software from the Open Source World.

Linux Mint 7 "Gloria" XFCE CE
* XFCE 4.6
Linux Mint 7 Gloria XFCE CE is now using XFCE 4.6. Have a look at the tour for more information.
* mintInstall improvements
Highlights: Featured applications, pre-filled information, seamless screenshots downloads, improved GUI layout. Some of the most popular applications were gathered in a new window named "Featured applications". This window shows the popular applications which are available and not currently installed on the system:
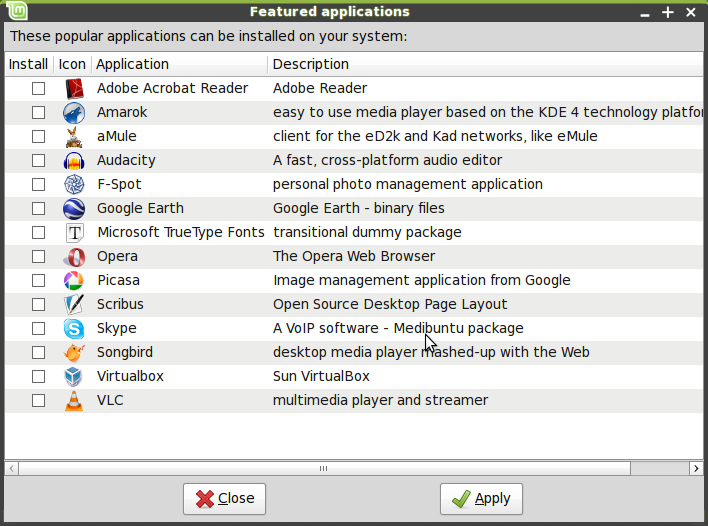
Featured applications in mintInstall
This makes it simpler for you to install most of what people are commonly looking for, all in one go.
The mintInstall frontend now comes pre-filled with all the data required to browse and install software, with the exception of the screenshots. Compared to the older versions of mintInstall this means you don't actually need to refresh the application to be able to use it.
When missing, screenshots are downloaded automatically. Of course, the "Refresh" button can still be used to download all of them at once.
The GUI layout was improved. The main window now shows less information and the once called "Versions" button was replaced with "More info".
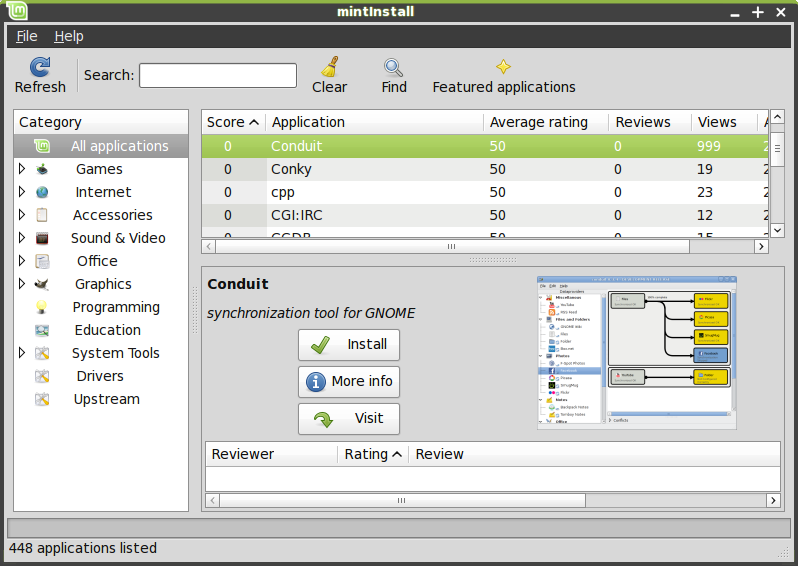
mintInstall's main window
This opens a window where you can see the versions, licenses, package names and repositories, but now also the upstream website, a long description, and the size of the packages.
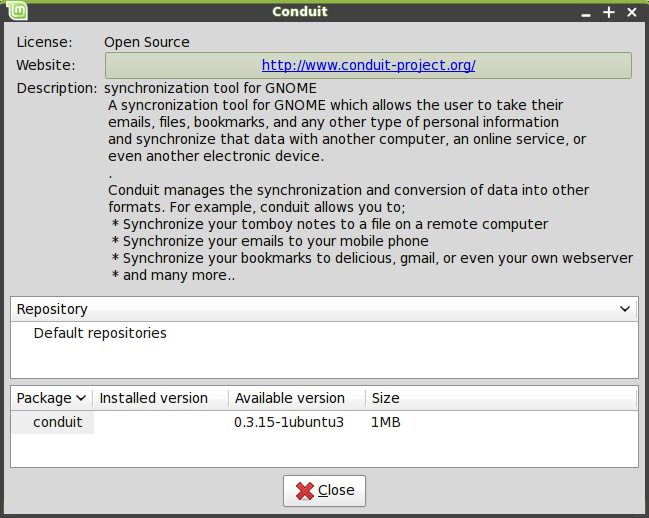
mintInstall's "More Info" window
MintInstall now runs in root mode and doesn't store any information in your home folder anymore.
* mintUpdate improvements
Highlights: Changelogs, package sizes, usability, The changelog tab now supports Linux Mint packages. Previous versions of mintUpdate could only show changelogs for packages maintained by Ubuntu.
mintUpdate now shows the download size associated with each package upgrade.
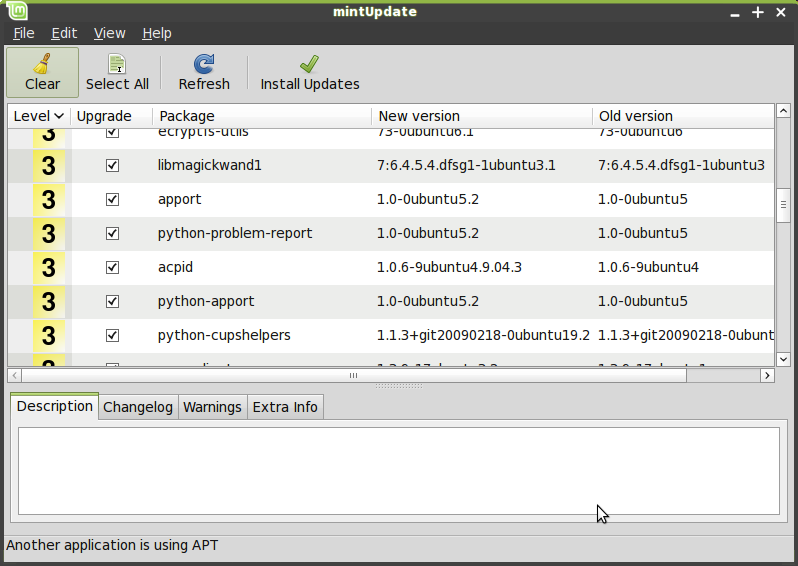
mintUpdate now shows the download size of each upgrade and supports Linux Mint changelogs.
mintUpdate's system tray icon does not blink anymore. The presence of available updates is still quite noticeable as different icons are being used. The update manager now feels even less intrusive.
* mintUpload improvements
Highlights: Ads-free, GUI improvements, graphical service manager, SCP/SFTP support All ads were removed from the the default service.
The GUI layout was improved in mintUpload to make the application simpler to use and to hide information which wasn't relevant to the selected upload service.
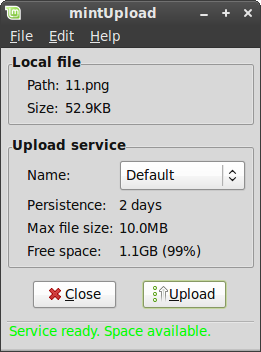
mintUpload's main window
Services can now be created, edited or deleted graphically via a new service manager.
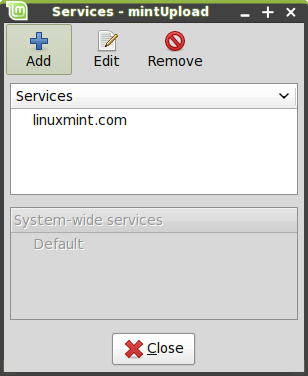
mintUpload's new service manager
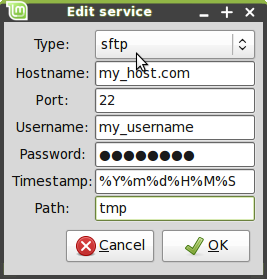
Editing a service in mintUpload
Two new protocols are supported by mintUpload: SCP and SFTP.
Credits go to Philip Morrell, Manuel Sandoval, and Dennis Schwertel for their work on the SCP/SFTP support and for their continuous help in improving mintUpload.
* mintWelcome
Linux Mint now comes with the following welcome screen:
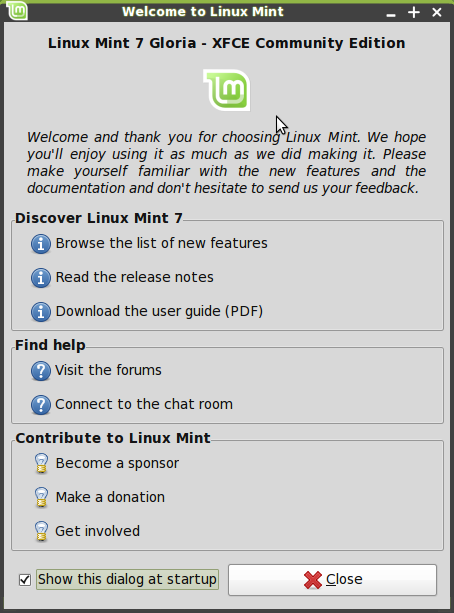
mintWelcome pointing new users to a few directions
Command line goodies - apt version, rtfm
You can quickly get the version of an installed package by typing "apt version" followed by the package name. For instance, "apt version firefox" gives you the version number of the firefox package.
RTFM is not an insult anymore, it's now a command. It's a simple link to the "man" command of course and it's nothing special, but if someone ever RTFMs you after you've asked questions on the IRC, don't feel bad about it, just say thank you. This is our way to make fun of the unfortunately well-established RTFM syndrom and we hope, if anything, you find it amusing.
New artwork
The default icon set was replaced with Gnome Colors.
Various upstream improvements in the Murrina engine used by the traditional Linux Mint theme make widgets, and buttons in particular, look better than they did before.
A new theme was included and set as default, based on Shiki Colors and the Mint-Dew wallpaper from Zwopper.
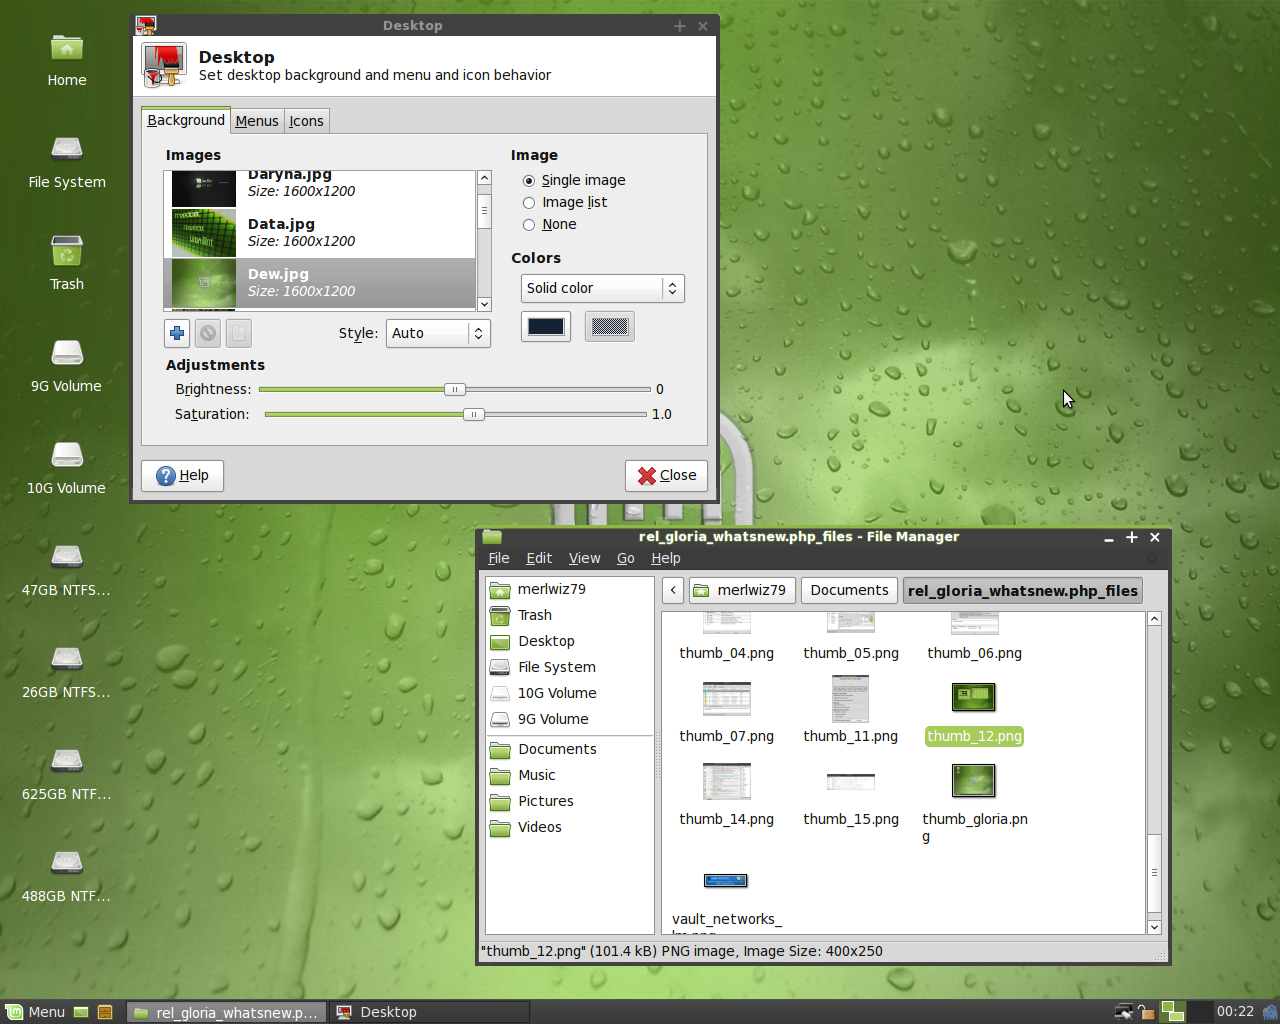
The new Shiki-Mint theme, Shiki-Wise + Mint Dew
Other Changes
- pyNeighborhood replaced FuseSMBTool and mintDesktop's automount.
- Transmission BitTorrent Client replaced Deluge.
- VLC was removed for space.
- Tomboy removed for space.
- aptlinex was installed for the apt urls in Firefox.
- All the old artwork was removed and will be made into a package.
- Samba was removed for space.
- Removed vim for space.
Other improvements
Firefox now comes with the Moonlight plugin and support for Silverlight 1.x.
The Firefox google search engine was enhanced to show links to popular search engines, as well as cached links and similar pages.
The Linux Mint 7 Gloria repositories are now signed.
Changes in the packages organization and the introduction of the mint-info virtual package make it easier to add additional desktops environments and editions on top of other ones. The new package hierarchy also makes it easier to upgrade Linux Mint.
mintSystem now comes with a new adjustment system, which restores important files at boot time. This strengthens the system against Ubuntu package upgrades overwriting Mint's specific configuration. This adjustment system can be configured in /etc/linuxmint/mintSystem.conf.
It is now possible to check the integrity of the liveCD and to boot the installer on its own.
MintAssistant was removed, and the installer now applies the same password to root as the one you choose for the main user.
Xchat now replaces Xchat-Gnome as the default IRC client:
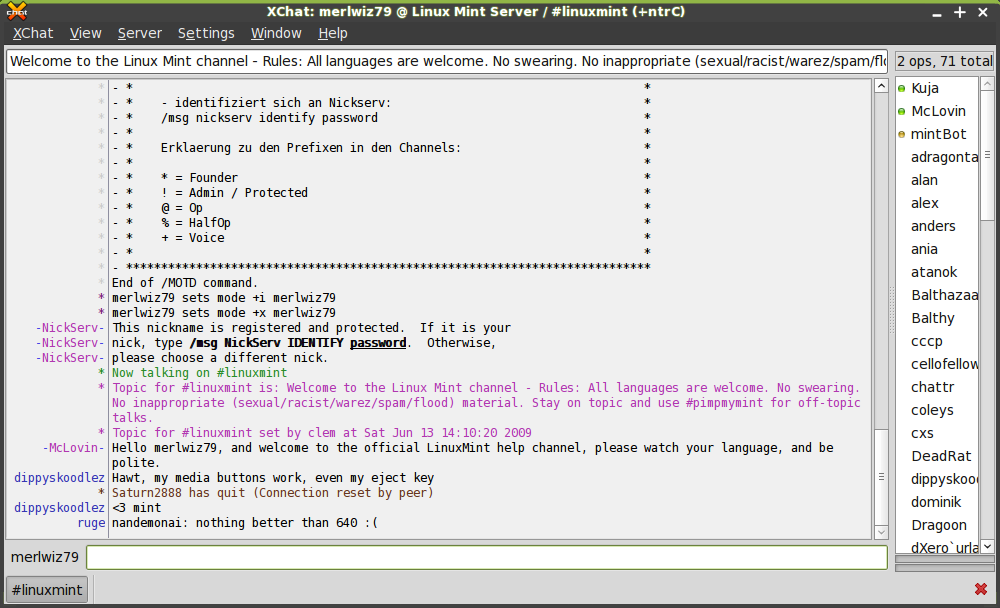
The Xchat IRC client
A new command-line tool called Inxi, was introduced:
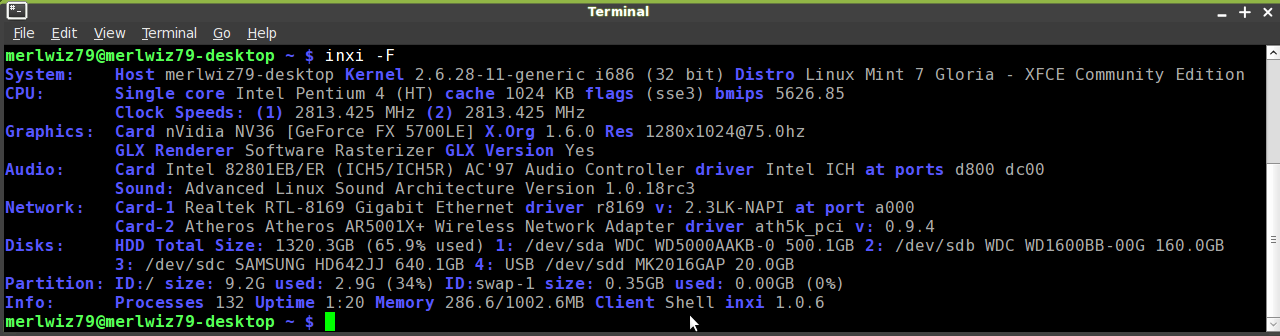
Inxi in action
Inxi shows various information about your system. An Inxi report can help a lot when asking questions on the forums or in the IRC as it helps others understand more about your system.
Small improvements:
- "apt purge" was fixed.
- "apt source" now runs in user mode.
- All Mint tools are now launchable from the command line.
- All Mint tools now detect their environment and adapt to it. In particular they know whether to use gksu or kdesudo. The consequence of this is that packages like mintupdate-gnome or mintupdate-kde are not needed anymore, and the same package is now compatible with all desktop environments.
- All Mint tools using an about dialog now show their own version number.
Upstream Improvements
Linux Mint 7 Gloria comes with a linux 2.6.28 kernel.
The Ubiquity installer features graphical improvements and support for the ext4 filesystem

Traditionally, constructing and hosting a website involved working with various web technology
and web standards. Technically speaking, since HTML and CSS are the backbone of any website, having some knowledge about them is a prerequisite. However, applications such as the Xara Web Designer, make construction of websites super-easy and very quick.

This software is designed primarily for people who want to make websites without having any knowledge of web technologies. The three most striking points of this application are the presence of ready-to-use web templates, being able to edit elements from within the application and most importantly, the price tag is impressive. In a little over Rs. 2000, you can make good websites quickly and seamlessly. Also, the various templates are quite intuitive and easy to use. Just shift through the ‘templates’ section, make your choice and get started in a matter of minutes.
Basically, this application manipulates the CSS at the backend and allows the user to make changes in the front end. Each element in the templates is replaceable and can also be manipulated or edited. Adding and replacing images, text and other elements is a piece of cake. Just drag and drop. You don’t need to worry about the code being prepared in the background—which doesn’t show itself in the forefront while you’re working. Although the intention was to perhaps have a solely GUI (graphical user interface) environment, an option to edit the code would add tremendous value—especially for advanced users. The absence of this option deprives a user of making fine tweaks to the code. Nonetheless this software will be highly appreciated by novice users and by people who want good results quickly.
The functionality of Web Designer is similar to that of both, an image-editing and page layout software such as Adobe Photoshop and InDesign. Changes to design elements and images can be made on-the-fly, so you won’t need to swap between different applications. Some of the features include, resizing and rescaling images, cloning elements, creating hyperlinks for images and text and so on. Basically it has most of the standard features that are required to design a website. You can preview the functioning of the ready website or webpage in the built-in browser interface. Once you’re satisfied, Web Designer—like other similar applications—lets you upload your website via FTP. Finally, it’s worth mentioning that if you need assistance, their website has many tutorial videos. Some of them are ‘beginner’s guide to Web Designer’, ‘resizing pages’, ‘photo rollover effects’, ‘flow text around’ and so on. All-in-all, at this modest price, Web Designer is a great application to have.

This tip is very useful particularly for home users who want to protect their system default settings against unwanted changes that other users can make. For example changes in system desktop appearance, themes, and screen saver as well as other display settings. Using registry editor, you can disable the right click functionality on desktop to access the "Display Properties" dialog box and this will also prevent users to access windows explorer.
Follow the given steps to disable the right click functionality on desktop:
To use this feature, you will need to be logged into your computer with administrative rights.
Click Start button and type regedit in Run option then press Enter for next.

Here locate the location to:
HKEY_CURRENT_USER\Software\Microsoft\Windows\CurrentVersion\Policies\Explorer

Here in right side panel, right click to create a new DWORD value with the name NoViewContextMenu (it is case sensitive), then assign number 1 in value data box.

Now close the registry editor and restart your computer after any changes to go into effect.
But next time, if you want to enable right click functionality on desktop then simply change the value of data box or delete the NoViewContextMenu DWORD item. First of all u need to find the model no. of your motherboard for downloading the appropriate BIOS from respective manufacturer's Website.To do this, check the motherboard's manual or check on the motherboard itself for a printed model number. Then accordingly, refer to the manufacturer's website for the model number and download the latest BIOS firmware from the support arena. Download the file and read the instruction given on the website or in the "readme"document downloaded along with the BIOS update file.
Usually, there are 3 ways to update the BIOS:
Usually, there are 3 ways to update the BIOS:
- Automatic BIOS updater software provided on the driver CD can be used. This software searches for the BIOS updates on the internet and automatically installs the latest one it finds.
- A BIOS flashing utility for Windows can be found on the driver CD or the manufacturer's website and can also be used for flashing the BIOS. Download the latest BIOS file and flash it using this software utility.
- Using the DOS prompt and the DOS based EXE file downloaded from the internet ( both the BIOS file and the utility will need to be downloaded). Then boot your machine using a DOS bootable CD or floppy and run the utility with the required parameters/switches for the flashing the BIOS.

Note:
Flashing the BIOS is risky and can be tedious. One wrong move can render your motherboard useless. Do this at your own risk or hae it done by a service center or service engineer. Ensure that there is no power failure when the bios is been flashed.
Tired of the boring old “start” button at the bottom left corner of your Windows XP’s monitor? Want something new to replace it? Well here’s how to change it.
With a few modifications in the Windows Registry, you can replace the “start” text with anything you like. Great for achieving a new, custom look for your Windows XP. So let’s get started.

Step 1: Modify explorer.exe
If the warning didn’t scare you enough, then the title of this step probably did. Yes, we are going to change Explorer, the backbone of your Windows XP, but don’t worry. Everything should be safe as long as you follow the steps closely.
Step 1: Modify explorer.exe
If the warning didn’t scare you enough, then the title of this step probably did. Yes, we are going to change Explorer, the backbone of your Windows XP, but don’t worry. Everything should be safe as long as you follow the steps closely.

As explorer is a binary file, we need a special tool to modify it. One of the best ones for this purpose is Resource Hacker. There are of course others that will get the trick done, but we will be using RH this tutorial so I recommend installing it to avoid making mistakes. Install it and let’s continue.
As always before changing anything. you want to back up. So open My Computer and navigate to and look for explorer. Copy paste it to a safe location on your hard drive.
Now that you’ve backed it up, fire up Resource Hacker and find the same explorer.exe.

When you’ve found and opened explorer in RH, navigate to String Table -> 37 -> 1033. The “start” value is on line 4, after the 578. Change the text “start” to anything you want, making sure you keep the quotes.
Note: make sure you choose Save AS, NOT just save!!
And that’s all for the first step! Now let’s move onto the second one -modifying the registry.
Step 2: changing the registry.

By now, you have a modified explorer sitting in the /inf/ subfolder, so we need to tell Windows to use that one, instead of the original one still resting untouched.
To do this, we need to make just one simple registry modification. To open up the registry, press start (something else soon  ) -> run and type regedit.
) -> run and type regedit.In the registry editor window that opens, navigate to HKEY_LOCAL_MACHINE\ SOFTWARE\Microsoft\ Windows NT\ CurrentVersion\ Winlogon and look for the registry entry “shell”. Click it.

Change the explorer.exe to inf/explorer.exe or whereever you saved the modified explorer.
And believe it or not, you’re done! All you have to do now is reboot or log out to see the changes. Enjoy your new custom Windows XP start button!
The run option of Start menu is used to run a program or to open a document directly. If you do not know the exact location of the program or document then click on Start button to open Run and type the programs shortcut name to open it directly.
Run Commands
-
appwiz.cpl -- Used to run Add/Remove wizard
-
Calc --Calculator
-
Cfgwiz32 --ISDN Configuration Wizard
-
Charmap --Character Map
-
Chkdisk --Repair damaged files
-
Cleanmgr --Cleans up hard drives
-
Clipbrd --Windows Clipboard viewer
-
Control --Displays Control Panel
-
Cmd --Opens a new Command Window
-
Control mouse --Used to control mouse properties
-
Dcomcnfg --DCOM user security
-
Debug --Assembly language programming tool
-
Defrag --Defragmentation tool
-
Drwatson --Records programs crash & snapshots
-
Dxdiag --DirectX Diagnostic Utility
-
Explorer --Windows Explorer
-
-
Fontview --Graphical font viewer
-
Fsmgmt.msc -- Used to open shared folders
-
Firewall.cpl -- Used to configure windows firewall
-
Ftp -ftp.exe program
-
Hostname --Returns Computer's name
-
Hdwwiz.cpl -- Used to run Add Hardware wizard
-
Ipconfig --Displays IP configuration for all network adapters
-
Logoff -- Used to logoff the computer
-
MMC --Microsoft Management Console
-
Msconfig --Configuration to edit startup files
-
Mstsc -- Used to access remote desktop
-
Mrc -- Malicious Software Removal Tool
-
Msinfo32 --Microsoft System Information Utility
-
Nbtstat --Displays stats and current connections using NetBIOS over TCP/IP
-
Netstat --Displays all active network connections
-
Nslookup--Returns your local DNS server
-
Osk ---Used to access on screen keyboard
-
Perfmon.msc -- Used to configure the performance of Monitor.
-
Ping --Sends data to a specified host/IP
-
Powercfg.cpl -- Used to configure power option
-
Regedit --Registry Editor
-
Regwiz -- Registration wizard
-
Sfc /scannow -- System File Checker
-
Sndrec32 --Sound Recorder
-
Shutdown -- Used to shutdown the windows
-
Spider -- Used to open spider solitaire card game
-
Sfc / scannow -- Used to run system file checker utility.
-
Sndvol32 --Volume control for soundcard
-
Sysedit -- Edit system startup files
-
Taskmgr --Task manager
-
Telephon.cpl -- Used to configure modem options.
-
Telnet --Telnet program
-
Tracert --Traces and displays all paths required to reach an internet host
-
Winchat -- Used to chat with Microsoft
-
Wmplayer -- Used to run Windows Media player
-
-
Wab -- Used to open Windows address Book.
-
WinWord -- Used to open Microsoft word
-
Winipcfg --Displays IP configuration
-
Winver -- Used to check Windows Version
-
Wupdmgr --Takes you to Microsoft Windows Update
-
Write -- Used to open WordPad


Today tip will help you to delete the files and folders that are being used by another programs and applications, for example a virus affected file. You have tried to delete such kind of files or folders and received the any following messages.

-
Cannot delete file: the file is in use by the other program
-
Cannot delete file: There has been a sharing violation
-
Cannot delete file: The file is in use by another program or user
-
Cannot delete file: Disk is not full or write-protected and that the file is not currently in use.
-
Cannot delete file: The source or destination file may be in use
Normally, a windows restart will allow you to delete such files or folders that are being used by other program, but if you want to manage it without restart your computer then simply you need to download a freeware tool called Unlocker.
You can download this tool for any windows version using Unlocker link. Download it and run the easy setup.
After installation, right click on file or folder that you want to delete and select the option Unlocker.

If your requested file or folder is used or locked by other application then a small window listing of lockers will appear.

Here simply click on “Unlock All” button and now you can easily delete this file.


